
30 Second Animated short
BRAVERY
Initial Thoughts:
As a theme, I think that there is a lot to work with on bravery. I went about researching some key ideas within literature to get a grip on some concepts to think about whenever we are putting together a story.
Dangerous Conflicts: There must be an action or a situation for a protagonist to overcome for them to portray the character trait of bravery.
The Element of Fear: For the audience to believe that a character is being brave, the creator must be conscious of building up a fear. It makes the character seem a lot more relatable and their actions so much more greater whenever they overcome the task or challenge.
Bravery Or Courage? Is there a difference between the two? How might one character show courage and other be brave?
At the first meeting, the group decided that we would be doing something a bit more lighthearted. Here are some of the ideas which we came up with.
WORLD WAR I
COMING TO THE IDEA
For this project I was looking to change things around a tad. From being on the last couple of projects I have worked on, they all deffer to essentially the same narrative to the one we were taught in first year.
I began to think about the keyword in the brief a bit more, "Bravery". I then had the idea to do something with VR, the brief being summarised by putting the viewer in a situation which required them to be brave.
Although that this never came to fruition in this group, I have taken it to doing something like this for my personal project.
BACK TO THE BEGINNING - We then decided that we would settle on the WWI theme, as it was the centenary of it.
Thinking about the VR path, had made us think more about how we could utilise audio in the animation. We found a letter of a solider from world war one, and we decided to base it off that, being the overlaying element of the narrative.
RESEARCH
&
PREPROCUTION


Some shot research I did for my role in the animatic.
I looked into historical re-enactments, historial reference, and the shots below are pulled from Kuberic's Paths of Glory (1957) and War Horse (2011).
While getting together the story, we also began deciding who would do what in the production process.
I wanted to do something which I hadn't had much experience in, so I decided to put myself forward for rigging the character. Everyone was going to do some modelling, and I also want to help with the post.
Models
For the first half of the project, I was in charge of the environment. I started by laying out a general plan for what the scene would consist of. It would be split into 3 sections, the bunker, the trench, and the battlefield.
With the interior, I modeled a couple of different collections of wooden planks and multiplied them to fit them into a room. This is quite an effective method of filling things out and is something that I am going to recreate in some of my future environments.


A more fleshed out environment with some more models
With second year all about trying out something new and more challenging, I decided to take to substance designer to make up some of my textures. I started out thinking that substance designer and substance painter are more or less the same thing. This was a vast misunderstanding. Designer is the precursor stage to Painter. It is all about manipulation of the elements which we take for granted whenever we are using Painter. The biggest problem with it is that you need to think about how your work is going to look whenever it is in the final render in arnold, Substance programs have their own render engine which is more suited towards the likes of a game. Many of the tutorials out there for Designer also are based around game design aswell, and although they are very similar in aspects, it means that just blindly following tutorials and not thinking or adjusting things to individual needs = having to redo work for no apparent reason.
For my overall skill set, I am glad I spent the time in learning Designer as a program. I think it will do me good in the long run. However, the trade off is becoming ever more relevant when looking back at the environment in the animation at the moment. It could have been filled out a lot more, more dense aswell. The learning lesson from this is that I need to think about balancing these trade offs in the most effective manner, and not wasting my own time working against myself.
.png)
.png)
.png)
.png)

Test of mud and concrete. Some procedural smoke can be seen in the background, preparation for the scene to be composited.
Specular level seems a bit high, however hoping to correct minor issues like that whenever it comes into post. Really liking how this shot has turned out.
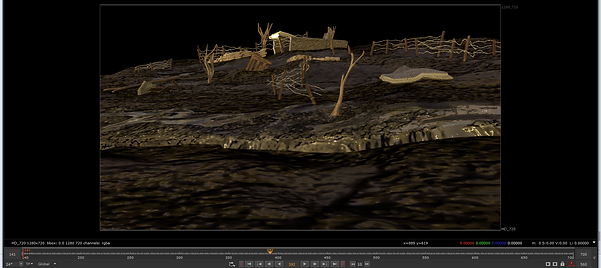
"NO MAN'S LAND" DEVELOPMENT
Whenever the scene was handed to me to start to break down the different elements for compositing, I was noticing that the environment was still looking quite bare. I decided to stretch the scale out for shots 8-9, and add in some bits and pieces into the background. Found a good tutorial on enviroment development, by an Italian VFX artist called Daniele Scerra, which was a great help.
http://www.cgarena.com/freestuff/tutorials/photoshop/babarossa/babarossa.html

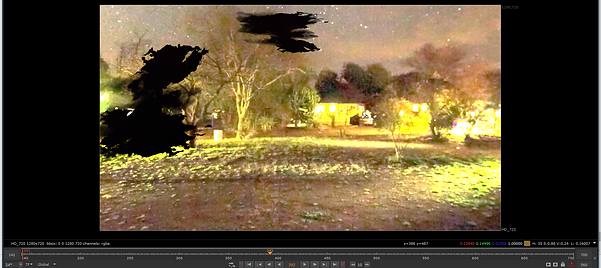
Firsts pass of improvements- landscape stretched out and more of the assets spread and altered a bit more. Still looking quite flat, however. Even though that it was just a WIP skydome, I quite like the apocalyptic glare its giving, and the strong yellows centre the viewers focus quite well.

Second pass developments: Some more explosions and atmosphereic effects added in. They are just planes with an image on them done in photoshop. For anything far away I think I will get away with it, for stuff which is closer I'm going to need to do some more procedural testings. Think its looking well, however there are still minor render setting issues to touch up.


Some early renders of procedural smoke. When I was looking into it, I saw that there was an plugin for Arnold to make it render out smoke in a hyper-realistic way. The first tutorial I used a set of procedurals from the OpenVDB website; http://www.openvdb.org/download/
They look really good, but the tutorial failed to mention the tedious plug in installation which needed to be done. I was curious to find out if you can use your own smoke to plug into the Arnold Volume node, which indeed you can. You just need to convert your fluids into this "vdb" format and load them into the volume option under Arnold.
THE RIG
Again, trying to test myself with this year, I put myself forward at the start of the project to do the rig, having have not rigged anything before. It was quite a learning curve to set up a fully working human rig.
I had found some great tutorials on plural sight, but due to time constraints and last minute going back and fourth with some of the details on the character, we were really pushed for time, especially if we were going to implement other programs such as Nuke for compositing.
A big problem I had with the character was that it was wasn't exactly symmetrical. The amount of time the character designer had spent on it made this incredibly stressful to work with, as we were already under pressure to get all of that done correctly. Whenever I did make progress, I would find some more problems with it, like faces that weren't connected or some poorly thought out topology. This tells me that when doing further productions, the person who designed the character should be the one to do the rig.
I got wind out an auto rigging programme called The Set Up Machine - from a technical standpoint I have no Idea how it works, and its fascinating that people would be able to code something like that. Some minor adjustments in terms of skin weights needed to be done after but as far as the rest of the project is concerned, for basic animation purposes it has done the job rightly.
Due to the fact I was actually really enjoying making the rig if it wasn't for awful time constraints, I am intending to go back and finish my own version of the rig myself. I think that learning how to rig will improve my overall proficiency with the programme, and will give me a lot more satisfaction seeing my characters come to life.
Early progress with the first version of the rig. Due to a problem with the the GUI getting the local rotation axis right was an absolute nightmare. This shows a brief comb through of the different points in the process to the final outcome in scene.


NUKE and post production
From my experience last year with discovering what render layers are, I can see the value to both my individual work and my project at a whole by learning a compositing software such as Nuke. From my basic knowledge and understanding of it, it appears to be a great way to correct a lot of mistakes without going through the painful and research draining aspect of re-rendering work, but also a powerful tool to add a final cutting edge to the product. I am glad that I got to use it in this project, as it looks like there is a lot to get used to.
Rending out scenes
The first and foremost task was to break down the environment into different layers to prepare it for rendering. This, like nearly everything in this cursed course, is an act which appears deceivingly simple but actually depends on how you thought out things from the very start. The way I had set up the trench was over-lapping with each other. This meant that often quite a lot had to be stored on the same layer in order in order to achieve a coherent flow. To save render time, I tried placing some of the shot layers with just one rendered image to see what I could have gotten away with. This worked well in some areas but completely backfired in others (i.e. shot 4, very obvious that no amount of post is going to fix that one)
Enviroment breakdown pics/gifs
Render settings to be correct is also one of these things you can only get right with trail and error. Wish I had thought this through a bit more, as the specular is all over the place in the final cut. It worked well for shot 6 (then shot 7) but due to the rush to get the hand in it ended up being a bit off. The addition of AOVs where originally going to be put in, but because of the amount of them and how heavy they make a file, it became very quickly clumsy to get files between each other. For the safest option, I decided not to have them in. By doing this, I did cut off quite a lot of control, but it is probably the biggest thing which I can bring to the next project I work on - and the most important thing to add in whenever scenes are going to be touched up for everyone's portfolio.
Render settings pic
Render settings pic
AOV RESEARCH
W.I.P
The next big task was to colour correct everything. Even with some simple adjustments, I was able to add quite a nice bit of style and vibrancy by playing about with certain tools. I also learnt what a premult and unpremult is in the world of VFX. Fun. That's what it means.
Larfs aside, its a pretty interesting concept, and its something which previous compositing software like After Effects actually did for you. You have to worry about these things yourself when dealing with Nuke.
Sourced from the book Nuke 101 and the video below, its one of the first things that you need to wrap your head around.
SHOT 4
.png)
Above: Node tree for for shot 4. Due to a mess up on my behalf of the render, I gave myself quite little to work with.
Below; Frame from shot 4. Think that the iridescence on this is quite nice. main contender for show reel. Main improvements would be to develop the smoke a lot more with the Aivolume plugin.
.png)
SHOT 5/6 (MERGED)
First render of shot 5/6 set put with the main animation occurring on with a strange cross section of the set. Setting all of this together got annoying quickly.
.png)
Re rendering took another day. But made me re think the environment a bit. Added another more depth with a backdrop and stuck in some textures imitating an explosion.
.png)
.png)
.png)
.png)
.png)
SHOT 7
This was the first shot which I started to work on. I found it a lot more interesting, and definitely a lot to work with in terms of different aspects to work in. Found this really fun to play around with, and considering that project fatigue has well set in at this point, it gave me another breath of life to get a good job done. Very happy with the result of this.
.png)
.png)
.png)
.png)
.png)
.png)
SHOT 8
Things were looking short, both in physical time and production length. Had some environmental assets which were moved out of scene in shot 4, so decided to lay them back out in the background with this one. This is one which is going to need to be re-rendered due to the specular hitting the scene pretty hard. Not entirely sure what I did to to the further layers, as the spectacular was pretty dampened. AOV's would fix a lot of this, I would presume. I really like the composition of this, and I can now see the value in the same person doing the storyboards as well as the very final production pieces. Makes scene layout a problem which is nearly eliminated, gives a set boundary to what needs to be filled in from the shot point of view allowing for more detailed environments, and also gives the compositor plenty of time to figure out what type of effect he must use to transpire the correct tone the shot wants to get across.
.png)
.png)
.png)
.png)
.png)